In this Article:
Sighting in, or “zeroing,” a rifle involves aligning the iron or telescopic sights with the barrel to ensure that bullets hit a target predictably at a specific distance. In this article, we’ll focus on telescopic sights or “scopes,” which provide substantial benefits over open sights, particularly at longer distances.
Scopes have advanced significantly, offering improved clarity and magnification to keep pace with the increasing power and precision of modern rifles and ammunition. There are two primary systems for aligning scopes, each with its own distinct origins and methods. The Minute of Angle (MOA) system, based on a base-60 scheme from astronomy, and the Milliradian system, a base-10 approach developed for artillery in the late 19th century, are both effective. Each system uses segments of an arc to indicate changes in trajectory at a given distance.
MOA — Minute of Angle
Brief
One minute of angle (MOA), or arcminute, corresponds to a deviation of about 1 inch at 100 yards, 2 inches at 200 yards, and 3 inches at 300 yards. On many MOA scopes, each adjustment increment shifts the reticle by 0.25 MOA (1/4 inch) at 100 yards, 0.50 inch at 200 yards, and 0.75 inch at 300 yards. These adjustments apply to both windage and elevation and are made by rotating a turret on the scope. Some scopes offer adjustments in 0.125 MOA (1/8 inch) increments, but many shooters find these too fine to be practical, particularly at longer distances.
For example, if you experience a bullet drop of 1.50 inches at 200 yards and wish to zero your rifle at that distance, you would need to adjust the elevation turret by 3 increments, or 0.75 MOA, since 1 MOA equals 2 inches at 200 yards. Using these calculations, Table 1 illustrates approximate MOA deviations and the value of one increment at different ranges.
| Arcminute Deviations | Incremental Scope Adjustments of 0.25 |
|---|---|
| 100 yards = 1.0 inch | 100 yards = 0.25 inch |
| 200 yards = 2.0 inch | 200 yards = 0.50 inch |
| 300 yards = 3.0 inch | 300 yards = 0.75 inch |
| 400 yards = 4.0 inch | 400 yards = 1.00 inch |
| 500 yards = 5.0 inch | 500 yards = 1.25 inch |
| 600 yards = 6.0 inch | 600 yards = 1.50 inch |
| 700 yards = 7.0 inch | 700 yards = 1.75 inch |
| 800 yards = 8.0 inch | 800 yards = 2.00 inch |
| 900 yards = 9.0 inch | 900 yards = 2.25 inch |
| 1000 yards = 10.0 inch | 1000 yards = 2.50 inch |
In order to compensate for a windage error of 2.50 inches to the right at 500 yards, you would need to adjust the windage turret toward the left by 2 increments or 0.50 arcminutes because a minute of arc equals 5.00 inches at 500 yards.
In Depth
The MOA system has its roots in ancient history, originating with the Sumerians around the 3rd millennium BC. They were the first to divide a circle into 360 degrees. The Babylonians later refined this concept by subdividing each degree into 60 arcminutes. Since an arcminute is 1/60th of a degree, a full circle contains 21,600 arcminutes (60 * 360). Although the MOA system operates independently and is somewhat arbitrary, it resembles Imperial units in its historical context, despite predating the Imperial system by over two thousand years.
True MOA
Shooting purists acknowledge a difference between commonly understood MOA and “true” MOA, which adheres strictly to the underlying mathematics. This meticulous attitude is necessary when acquiring targets that are several hundred yards away because the minor variations of rounded numbers are magnified by distance. In June of 2017, a Canadian Special Forces sniper downed an Islamic State militant from just over 2 miles away. The bullet took 10 seconds to reach its target. Shooting at this distance and accounting for wind, angle of trajectory, light aberration, and even the Earth’s curvature leaves no margin for error. More practically speaking, striking a mule deer from 400 yards, down a powerline slash in Western Montana requires you to be “on your game.”
Calculating the exact deviation of one MOA is a problem of geometry. The circumference of our circle is determined by the radius or distance from the shooter to target. At 100 yards, using the formula of 2 pi r, we find that 2 * 3.14 * 100 = 628 yards. As there are 36 inches to a yard, the circumference in inches is 22,608. Now, all that remains is to divide by the number of MOA’s in a circle (21,600) and the quotient is 1.047. This is the actual deviation of one MOA at 100 yards.
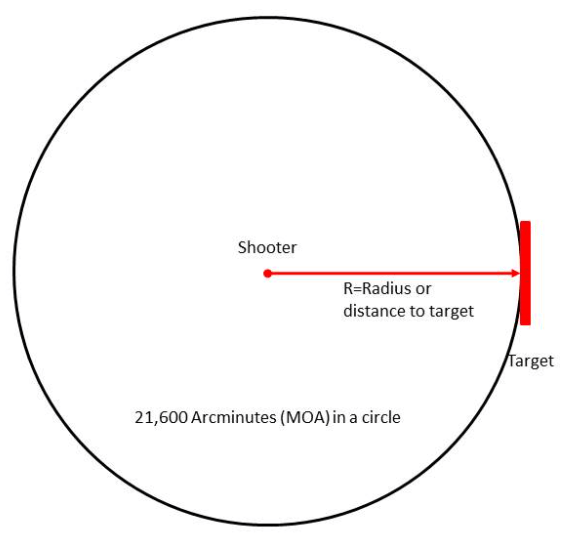
Using this precise figure, we can create a table of MOA deviations to achieve greater accuracy. It’s important to note that the difference from rounded numbers becomes nearly half an inch at 1000 yards.
| TRUE Arcminute Deviations | TRUE Incremental Scope Adjustments of 0.25" |
|---|---|
| 100 yards = 1.047 inch | 100 yards = 0.2617 inch |
| 200 yards = 2.094 inch | 200 yards = 0.5235 inch |
| 300 yards = 3.141 inch | 300 yards = 0.7852 inch |
| 400 yards = 4.188 inch | 400 yards = 1.0470 inch |
| 500 yards = 5.236 inch | 500 yards = 1.3088 inch |
| 600 yards = 6.282 inch | 600 yards = 1.5705 inch |
| 700 yards = 7.329inch | 700 yards = 1.8323 inch |
| 800 yards = 8.376 inch | 800 yards = 2.0940 inch |
| 900 yards = 9.423 inch | 900 yards = 2.3558 inch |
| 1000 yards = 10.47 inch | 1000 yards = 2.6175 inch |
Let’s examine a few real-world scenarios using these more precise MOA numbers. For example, a Norma 150 grain, 7mm Magnum bullet experiences a bullet drop of 21 inches at 400 yards. To correct for this drop, you would need to adjust the elevation turret by 20 increments of one-quarter MOA, totaling 5 MOA. This is based on the fact that one MOA equals 4.188 inches at this distance.
In another scenario, if you’re shooting a 180-grain Remington Express .30-06 rifle, zeroed at 200 yards, and you need to account for a target at 400 yards with a bullet drop of 23 inches, you would adjust the elevation turret by 22 increments to compensate for the drop. Additionally, if you are shooting north and facing a 10 mph wind from the east, the wind drift is approximately 12 inches, given the bullet’s ballistic coefficient. To correct for this wind drift, you would adjust the windage turret 11 increments to the right, which amounts to nearly 3 MOA.
BONUS OFFER: Get your free shooting range targets to print at home!
Get your free targets to print at home!
MRAD — Milliradian
Brief
A radian, often abbreviated as “rad,” is the standard unit of angular measure in many mathematical contexts and is slightly less than 57.3 degrees. A milliradian, or “mil,” is one-thousandth of a radian, with approximately 6283 mils in a full circle.
Like arcminutes, milliradians have specific values at various ranges, and these values are typically expressed in meters rather than yards, which will be discussed further. Milliradian scopes usually feature adjustments in 0.10 mil increments because even a single full mil can cause significant changes, especially at 100 meters.
For milliradians, a deflection of 0.10 mils translates to 1 cm at 100 meters, 2 cm at 200 meters, and 3 cm at 300 meters. This straightforward relationship simplifies trajectory calculations and adjustments for windage and elevation. For example, if you need to correct for a bullet drop of 33 cm at 300 meters, you would adjust the elevation turret by 11 increments. To compensate for a wind drift of 3 cm to the right at 100 meters, you would adjust the windage turret by 3 increments to the left.
In Depth
The milliradian system is a method of angular measurement based on the International System of Units (SI), which is grounded in scientific principles. A radian is mathematically defined as an angle subtended by an arc whose length equals the radius of the circle. Consequently, a milliradian, or “mil,” represents 1/1000th of the radius. This system was first proposed by Swiss engineer Charles-Marc Dapples in the mid-19th century and gained widespread use with French artillery during World War I.
In practical terms, a deflection of 0.10 mils translates to 0.9999 centimeters (cm) at 100 meters, which is effectively rounded to 1 cm. The minuscule difference of one ten-thousandth (0.0001) of a centimeter is negligible. Even at 1000 meters, the error margin would be only 0.001 centimeters (99.99 vs. 100 cm). Therefore, at 200 meters, a tenth of a mil is considered equivalent to 2 cm, and at 300 meters, it is 3 cm. Based on these values, we can create the following table:
| Mil Deviations | Incremental Scope Adjustments of 0.10 Mils |
|---|---|
| 100 meters = 10 cm | 100 meters = 1.0 cm |
| 200 meters = 20 cm | 200 meters = 2.0 cm |
| 300 meters = 30 cm | 300 meters = 3.0 cm |
| 400 meters = 40 cm | 400 meters = 4.0 cm |
| 500 meters = 50 cm | 500 meters = 5.0 cm |
| 600 meters = 60 cm | 600 meters = 6.0 cm |
| 700 meters = 70 cm | 700 meters = 7.0 cm |
| 800 meters = 80 cm | 800 meters = 8.0 cm |
| 900 meters = 90 cm | 900 meters = 9.0 cm |
| 1000 meters = 100 cm | 1000 meters = 10.0 cm |
Table 1. Mil and 0.10 mil deviations at ranges from 100 to 1000 meters.
Now, let’s consider some practical examples. Imagine you are shooting a 140 grain 7.62 mm bullet from a rifle that is zeroed at 100 meters, aiming at a target 300 meters away. The bullet drop at this range would be 42 centimeters. To correct this, you would need to raise the elevation turret by 14 increments because each 0.10 mil corresponds to 3 cm at 300 meters. In another scenario, if you’re using a Hornady 140 grain 6.5 mm Creedmoor at 500 meters and it impacts 5 cm to the right of your target, you would need to adjust the windage turret by 1 increment to the left. This is due to the fact that each 0.10 mil equals 5 cm at 500 meters.
MOA vs. MRAD
Each system has advantages. Here are a few considerations:
MOA Advantages
- 1/4 MOA adjustments (2.1675″@1000 yards) are nearly twice as refined as 1/10 mil adjustments (3.93701″@1000 yards).
- MOA is more familiar if you live in a country that uses Imperial measurements.
- Most ballistic tables are in feet and yards.
MRAD Advantages
- Base 10 metric values calculate more easily.
- More high-end equipment is MRAD & more pros use it.
- The US Military and many other forces around the globe have standardized on MRAD, influencing production & use.
Ultimately, both systems are equally effective in their own right. The key consideration is not which system is inherently superior but which one suits your needs better. If you are more accustomed to the Imperial system of measurements (inches, feet, yards), the MOA system may feel more intuitive. Conversely, if you prefer the Metric system (centimeters, meters), the MRAD system might seem more familiar and straightforward. Regardless of your choice, having at least a basic understanding of the other system is beneficial, as there are significant overlaps between them.
- Many scopes mix the two systems, having a mil dot reticle but turret adjustments in one-quarter minutes of arc.
- Although math is simpler in the base-10 metric system, most ballistic charts are in imperial measurements, requiring conversion from feet and yards to centimeters and meters.
Popular Articles
Subtension
Subtension describes the length of an arc at a specific distance, defined by two radii separated by a given angle. This term is relative and depends on the measurement system being used. For example, in the MOA system, subtension is measured in arcminutes, yards, and inches.
Consider viewing an object 100 yards away with a field of view spanning two minutes of arc. In this case, the subtension would measure 2.094 inches. This means that an angle of two MOA corresponds to an arc distance of 2.094 inches at 100 yards. Similarly, an arc of one milliradian at 300 meters equates to a circumferential distance of 30 centimeters. Although these concepts might initially seem complex, mastering the correct terminology is crucial for understanding and effectively applying them.
Subtension becomes particularly useful when using a scope reticle to determine the size or distance of an object, as well as for accurate shot placement. In the following section, we will explore how subtension is applied for these purposes in more detail.
Triangulation
Triangulation is the method used to determine a distance or location by referencing two known points. This principle applies to both MOA and MRAD systems, although we will focus on MRAD for clarity due to its more straightforward mathematics.
Milliradian (mil) scopes feature turrets that adjust in increments of mils and have reticles segmented into mils, with each segment representing the space between dot centers. You can utilize milliradian measurements to zero your scope at a specific range, evaluate shot groupings, determine target size, or calculate distance.
To gauge shot accuracy, use the reticle as a measuring tool. For example, if your rangefinder indicates 1000 meters and your bullet lands 1 mil to the right, this translates to a deviation of approximately 100 cm or 1 meter. This same method can measure shot groupings: if your shots are within a mil of each other at 1000 meters, they are within 1 meter of one another. Similarly, if a target appears to be 1 mil tall at 1000 meters, it is roughly 1 meter tall in reality. You can also compute the range by knowing the target size. For instance, if a 1-meter square target (1000 mm) covers 1 mil on your reticle, divide 1000 mm by 1 mil to find the range: 1000 meters.
Magnification
Magnification is an important consideration when triangulating. If the reticle is installed on the first focal plane of the scope, it will alter by magnification exactly as the view and remain constant with respect to target image. Such a reticle may be used at every level of amplification. However, if the reticle is installed on the second focal plane, it will remain fixed in size as the view changes, varying the ratio between mils and image. In this case, triangulation may only be performed at one designated magnification; usually at the highest point or halfway.
Calculations and Conversions
Here are some formulae that make manipulating both Imperial and Metric measurements more accessible:
Formulae for Milliradian Based Reticles
Distance to Target (Yards): D=H/I×1000
Where D is target distance (yards), H is target height (yards), I is image size (mils), and the quotient is multiplied by a factor of 1000.
Distance to Target (Yards): D=H/I×27.77
Where D is target distance (yards), H is target height (inches), I is image size (mils), and the quotient is multiplied by a factor of 27.77.
Distance to Target (Meters): D=H/I×25.40
Where D is target distance (meters), H is target height (inches), I is image size (mils), and the quotient is multiplied by a factor of 25.40.
Distance to Target (Meters): D=H/I×1000
Where D is target distance (meters), H is target height (meters), I is image size (mils), and the quotient is multiplied by a factor of 1000.
Distance to Target (Meters): D=H/I×10
Where D is target distance (meters), H is target height (centimeters), I is image size (mils), and the quotient is multiplied by a factor of 10.
Formulae for Arcminute Based Reticles
Distance to Target (Yards): D=H/I×95.5
Where D is target distance (yards), H is target height (inches), I is image size (MOA), and the quotient is multiplied by a factor of 95.5.
Distance to Target (Meters): D=H/I×87.30
Where D is target distance (meters), H is target height (inches), I is image size (MOA), and the quotient is multiplied by a factor of 87.30.
Distance to Target (Meters): D=H/I×3438
Where D is target distance (meters), H is target height (meters), I is image size (MOA), and the quotient is multiplied by a factor of 3438.
Distance to Target (Meters): D=H/I×34.38
Where D is target distance (meters), H is target height (centimeters), I is image size (MOA), and the quotient is multiplied by a factor of 34.38.
BONUS OFFER: Get your free shooting range targets to print at home!
Get your free targets to print at home!
Application
So far, our examination of this subject has been mostly theoretical and the calculations approximate. In the field, there are many considerations. You need to watch a few hundred bullets of your favorite caliber go down range from your preferred setup before you can make calls that result in consistent hits at distances well over 100 yards. Still, shooting accurately begins with assumptions based on theory. Then it must be refined by hard core experience. There is no shortcut to shooting accurately in such highly variable situations as big-game hunting or battle. You just have to live there for a bit. Keeping that in mind, here is some useful advice.
Scope and Mount
Standardize on ONE System
Select a scope with reticle segments and turret adjustments that are in the same measurement system, and use similar scopes across all your firearms. Opt for either an MOA reticle with 0.25″ MOA adjustments or a mil-dot reticle with 0.1 MRAD adjustments. Mixing different systems will introduce unnecessary complexity to your calculations when zeroing, ranging, and making other adjustments.
Mount and Align Your Scope
Mount your scope as low as possible following established procedures. This process involves numerous variables that exceed the scope of this article. If you are uncertain about the mounting process, consider having a professional gunsmith handle it for you.
Set Eye Relief
Verify and adjust the eye relief carefully. If the focal distance of the scope is not set correctly, the recoil from the weapon can cause the scope to hit your forehead, leaving a distinct ring on your skin.
Align the Reticle
Ensure that the crosshairs are perfectly aligned with the vertical and horizontal planes. If they are misaligned, all of your adjustments will be inaccurate. This misalignment is known as reticle cant.
Sighting In
Get Set & Level
Position yourself and the weapon securely and comfortably on a level surface. Your steadiness and precision in handling the weapon are crucial for accurate testing and adjustments.
Zero Point
Choose a point where you want your rifle to be zeroed, based on the bullet trajectory and your expected shooting range. Bullets follow an arcing path, rising slightly at first due to their initial energy before dropping as gravity takes effect. Therefore, your Point-of-Aim (POA) and Point-of-Impact (POI) will intersect at two points: early and later in the trajectory. Ideally, you should adjust the zero so that the point where you aim and where the bullet lands are close over a considerable distance, providing accuracy within a few inches across a range of distances.
If your shooting distances exceed the overlap between POA and POI, adjust the weapon for the range you most commonly encounter.
Test, Test & Test
Conduct repeated tests in three-shot groups, adjusting the weapon based on your results. Always use the same factory ammunition or carefully crafted reloads both at the test bench and in the field.
Minimize variables in each testing session by maintaining consistent conditions, such as the time of day, weather, and your usual attire. As you progress in practice, you will intentionally introduce changes to these variables to enhance your adaptability.
Ranging and Sizing
Determining target size and range demands a sharp eye for detail, as distant images can seem quite small. On the other hand, your target might be larger than the segments of the reticle. Achieving accurate readings involves making a well-informed assessment. Here are some helpful tips:
Multiply & Divide
If your target is smaller than one full graduation or is just slightly larger than one, compare the fractional part to the next whole segment on the reticle. Determine if it’s a quarter, half, or three-quarters of a segment.
If your target exceeds the graduated portion of the reticle, which typically covers around 10 graduations (5 on each side of the center), position the scope so that one edge of the target aligns with the edge of the reticle markings. Estimate how much of the target extends beyond the graduated area. Visualize the reticle lines or dots extending further. Count how many additional segments would fit to cover the entire target. Alternatively, you can divide the target into halves or quarters, measure a segment, and then multiply accordingly to get the full measurement.
Increase Your Average
Assessing the size or distance of a target can be challenging if it is on a slope, at an angle, or changing positions. In such cases, taking multiple measurements and averaging them can provide a more accurate estimate. For instance, if you are aiming at a pronghorn buck grazing on a hill, and you know the buck stands around 36-40 inches high at the shoulder, measure the height from the shoulder to the front hooves with your reticle. Then, readjust your aim to measure from the top of the hindquarters to the rear hooves. Combine these measurements and divide the total by two to get the average size. If this average size measures 6 MOA, the buck is approximately 600 yards away. This method is also useful when the target changes stances during your observation.
Scale
If your target is positioned next to a known reference, like a fence line which typically stands at around 50 inches tall, you can use this information to estimate the size or distance of your target. Measure the height of your target relative to the fence using your reticle and calculate based on this comparison.
Non-Graduated Reticles
Some reticles are simple crosshairs, but they can still be effective for measurement. For instance, if you are assessing a black bear at 200 meters, position the crosshair at the bear’s shoulder and then use the elevation turret to move the crosshairs down to its paws, counting the clicks as you go. If the adjustment required 25 increments of 1/10th mil, you can estimate that the bear is about 80 cm or 36 inches tall, even if it’s partially obscured by ground cover.
Holds and Windage Adjustments
Calculations don’t always result in neat numbers, and sometimes you’ll find the required adjustment falls between standard increments. For instance, if you need a vertical adjustment of 7.5 cm at 300 meters and each tenth of a milliradian equals 3 cm, no whole number of adjustments will perfectly match the needed change. In such cases, you’ll need to use a hold-over. This requires estimating how much to aim above your target to account for the difference. For example, if adjusting the vertical turret by two increments moves the point of aim (POA) up by 6 cm, you’ll need to hold an additional 1.5 cm above the target. This may be just a fraction of the crosshair’s thickness at 300 meters!
Holds are often necessary when you can’t adjust the scope precisely in time. Imagine you’re sitting on a powerline slash and an eight-point white-tail buck quickly appears at 150 yards. With no time to adjust your scope, you’ll need to estimate how much to aim over the target based on your rifle’s zeroed distance of 100 yards.
Similarly, windage adjustments sometimes require quick, on-the-fly decisions, known as Kentucky windage. If you need to correct for a wind drift of 7.5 inches to the left at 300 yards, two clicks might give you about 6.25 inches of adjustment. You would then need to adjust your POA slightly to account for the remaining 1.25 inches.
Kentucky windage isn’t just for wind drift; it’s also useful for leading moving targets, like a bird in flight. Although the target is slower than the bullet, it will have moved by the time the bullet reaches it. Leading a moving target effectively requires practice and is a skill developed over time. While this article doesn’t cover it in detail, many resources are available to guide you.
A practical tool for improving your windage skills is the Beaufort scale, which estimates wind speed based on common observations. To refine your wind speed judgment, consider using a digital anemometer, which accurately measures wind speed and is relatively inexpensive. Training with such a device helps calibrate your wind perception, enabling you to make precise windage adjustments with confidence.
The Beaufort Scale
| 1mph-3 mph | Smoke moves in direction of wind, slight movement of grass. |
| 4 mph-7 mph | Wind felt lightly on the face *Very Accurate* |
| 8 mph-12 mph | Leaves turn, twigs and treetops will be in motion. |
| 13 mph-18 mph | Loose paper, dust, and paper will blow around, small tree branches will move. |
| 19 mph-25 mph | Large tree branches move, entire trees will sway if small. |
| 25 mph-30 mph | Large branches will be in constant motion and walking against the wind becomes difficult. |
Between the Lines
Precision shooting is as much an art as it is a science, which is why skilled marksmen are so highly esteemed. Beyond the fundamental measurements and calibrations, numerous factors come into play. Elements such as the scope mount, action type, barrel length, rifling twist rate, bullet design, barrel fouling, and even thermal flux from a hot barrel—all influence accuracy. Your physical abilities, including strength, visual acuity, breathing, shooting stance, steadiness, and mental state, further impact your performance. Coupled with environmental variables like wind, altitude (which affects air density), lighting, visibility, and angle, you face a complex, ever-changing scenario that alters the outcome each time. Mastery in shooting involves skillfully managing and interpreting these variables to consistently hit the mark.
To enhance your shooting skills, practice with targets of known sizes at specified distances under diverse conditions. Set up scenarios where the target is either too small or too large, the wind and light conditions vary, and you shoot from different elevations. For instance, how does a 125 cm target appear at 400 meters? What about a 9-inch target at 100 yards? How does low light at dawn or dusk affect your perception? What challenges arise when shooting uphill or downhill?
Such practice will gradually fine-tune your perception and mental adjustments, making them second nature and integrating them with your scope. You will essentially become an extension of your weapon. Indeed, the rifle is just a tool; it is you who are the true weapon.
Use the insights gained from this article to refine your shooting abilities. Enjoy your practice and aim for excellence!
This article is the outcome of much research and the first-hand practice of many shooters. However, individual experiences vary. If you have results that differ from ours or conflict with our findings, we would love to hear your perspective.


![9mm Glock Models [Ultimate Guide]](https://www.snipercountry.com/wp-content/uploads/2018/10/Glock-17-vs-Glock-19-vs-Glock-26-vs-Glock-41-vs-Glock-43-WM-400x250.jpg)
![Handgun Caliber Chart [2025 Ultimate Guide]](https://www.snipercountry.com/wp-content/uploads/2018/10/Handgun-Caliber-Comparison-400x250.jpg)
![Rifle Calibers [Ultimate Guide]](https://www.snipercountry.com/wp-content/uploads/2018/12/Header-1900-400x250.jpg)


![4 Best 3Gun Scopes [2018]](https://www.snipercountry.com/wp-content/uploads/2018/06/4-Best-3Gun-Scopes-2018-260x195.jpg)

Very good information, Thanks
Great info. I’m not a shooter )just starting), but I am a physicist. One of the questions I get asked quite often is, “what is a radian?”. You answered this nicely in your article. I also like to include “1 radian is about 57 degrees”. This immediately puts the relation between the two into perspective.
Great article to read although obviously directed towards a American audience. I have looked for clarification on the difference of MOA and MRAD and yet everyone in America continues to speak of MRAD in inches and yards. Whilst the rest of the world changed decades ago to a decimal system of centimetres, metres and kilometres, America seems unable to change to a system that they themselves inspired with the implementation of the dollar (100 cents to a dollar !?).
Is MRAD 10cm at 100 metres? . Please for the sake of clarification when working in mils, or MRAD please speak in a decimal terminology. One mils is 1/10 th of 360 degrees…..? and a tenth is a decimal???
Thanks
Yeah, it’s tragic right? And the US is still the only country to put not just one but 12 men on the surface of the moon.
Thanks for the article. It really helped me to start understanding MOA & MRAD. I have never shot long distances but I have always wanted to try. I’m working on getting a gun and deciding what i think I will want for a scope.
Good read and informative but I do want to add to the last section about variable power scopes.
There are two types of rifle scopes out there, first focal plane (FFP) and second focal plane (SFP). Second focal plane scopes account for the majority of the ones mounted on rifles out there, mainly because they are cheaper to make than first focal plane scopes. FFP rifle scopes though have a perk that when you zoom, your crosshair actually “enlarges” as you zoom in. This means that no matter how high or low in magnification you go, your crosshair will remain accurate for ranging purposes. Most SFP scopes that have Mil-dots have a specific magnification to where the zoom corresponds with the mils correctly, with the majority of 4-12x scopes having 6x being the correct magnification to read properly and can be found at most scope manufacturers websites.
There are benefits and downsides to both types of scope though. SFP scopes are much cheaper to purchase, reliable and in general good enough to get the job done. Downsides can be making the wrong adjustments if at to high/low of a magnification can mean you miss your shot or place poorly. FFP scopes on the other hand do offer consistency in ranging, and excel at long to very long distances. The downsides though are that when shooting at closer ranges you have to adjust parallax, more so the closer you get, and at the highest magnifications you start to loose some brightness to the image. Add in that the cheapest FFP scopes cost around $300 and easily go into the quadruple digits for high end models and you can end up with a very pricey rifle.
When it all comes down to it, either scopes are more than capable in their own right, and the biggest deciding factor is how much you plan to practice with your rifle. Going out for that buck once a year and the rifle stays in the safe the rest of the year? Get a SFP scope and re-zero each year before your hunt and keep it within 150 yards and you’ll be set. Going out for 1000 yard shooting with a high end rifle that you enjoy frequently, get an appropriate FFP scope that’ll let you hit a hog from 800 yards after ranging and you’ll be good.
Your dedication to what you want to accomplish is what can help you be good at using MOA or MRAD, practice really does influence how well you can shoot.
Informative, well written article.
There is a mistake in this article where is compares 1/4 MOA and .1Mil at 1000 Yards. “1/4 MOA adjustments (2.1675″@1000 yards) are nearly twice as refined as 1/10 mil adjustments (3.93701″@1000 yards).” 1/4MOA is 2.6175in @1000 yards. While it is more refined than .1Mil, it is not almost twice as refined. More like 66% of a .1Mil. Negligible difference. I use MOA as well.