
Basic Terms
To understand Scope Parallax, let’s start with basic terminology to explain what goes on inside a scope and the eyes of the shooter. However, this will exclude lenses that are used to rectify optical or color errors. The emphasis here is on image forming.
Starting at the front is the Object. This is the shooter’s target.
The Objective is the front lens, which forms the initial image of the Object (target), hence it’s called the Objective.
The lens absorbs the light to refine the image quality of the scope, so if the Objective is sub-standard, you’ll end up with a poor image. Typically, a shooting and spotting scope lens comprises two glass parts called Elements that fit closely together called an Achromat. The Achromat is fixed for complete blue and green color correction while red wavelengths are moderately adjusted and have minor residual color errors.
The quality of an Objective can vary from low-grade, average to excellent, and where one of the Elements consist of an ED or Fluorite (CaF) glass. Where an Objective has three Elements with complete color correction for blue, green, and red, it’s referred to as an Apochromat. Having all three colors, it’s the best lens available, especially where one Element has an ED or Fluorite glass.
| Objective | Front lens (forms initial image of the Object). |
| Object | The target or Object you are aiming at. |
| Elements | The two glass parts of a typical shooting or spotting scope lens. |
| Achromat | Combined of the Elements, the Achromat is fixed for complete blue and green color correction. Red color however is not fully adjusted and therefore is not perfect. |
| ED | A very dense glass |
| Fluorite | A crystalline mineral that, when rendered as glass, has very low dispersion meaning it is exceptional at showing all colors focused at the same point. |
| Apochromat | The two glass part of a typical shooting or spotting scope lens that has complete color correction, for blue, green AND red. |
BONUS OFFER: Get your free shooting range targets to print at home!
Get your free targets to print at home!
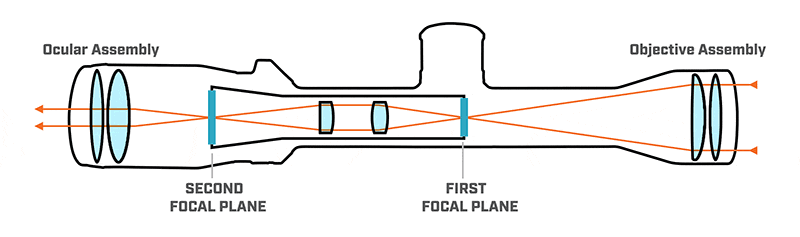
First Image Plane
The First Image Plane is defined where the Objective takes the light to create an image of the target, which is upside down and right-left reversed.
Second Image Plane
Next, is the Erector Lens (or Erector Cell where there’s a group of lenses). Where the first lens is upside down, a simple optical group of lenses called the Erector Cell is used to turn it the right way. This presents the image the right way and is referred to as the Second Image Plane.
The Erector Cell allows the Second Image Plane to move using micrometer spindles to provide elevation and windage adjustments. These adjustments (MOA from bottom to top) are controlled by the Cell’s amount of movement allowed by the spindles. The movement per click is regulated by the thread of the screw as well as the detents spacing on the spindle.
In theory, this is the Second Image Plane, but shooters call it the First Image Plane when referring to reticles. The reticle is placed in this ‘First’ Image Plane in fixed and variable power scopes. In a variable scope with a standard (non-magnifying) reticle, the zoom group of optics can change the image size plane to create a Third Image Plane. The reticle is placed here allowing the image to change size, but the reticle size remains the same.
| Erector Lens | (or Erector Cell in a group of lenses) - a single optical group of lenses which turns the 'First Image Plane' from upside-down to the correct way up. |
| Second Image Plane | In theory, the image now corrected. However, shooter's call this the First Image Plane. |
| Third Image Plane | The image output when a variable scope is combined with a standard non-magnifying reticle. |
Then, there’s the Eyepiece, an optical group with the sole purpose to allow the shooter to focus on the reticle. It cannot be adjusted to correct for parallax.
In a nutshell, a zoom scope is set for infinity range.
The image of the Object is created upside down and right-left reversed. Behind the Objective (First Image Plane), the Erector cell reverses the image so it’s the right way in the Second Image Plane. The zoom group adjusts the Second Image Plane to create the Third Image Plane. The reticle is placed in this last image plane and the Eyepiece is used to focus on the reticle and the image.
Popular Articles


![9mm Glock Models [Ultimate Guide]](https://www.snipercountry.com/wp-content/uploads/2018/10/Glock-17-vs-Glock-19-vs-Glock-26-vs-Glock-41-vs-Glock-43-WM-400x250.jpg)
![Handgun Calibers [Ultimate Guide]](https://www.snipercountry.com/wp-content/uploads/2018/10/Handgun-Caliber-Comparison-400x250.jpg)
![Rifle Calibers [Ultimate Guide]](https://www.snipercountry.com/wp-content/uploads/2018/12/Header-1900-400x250.jpg)
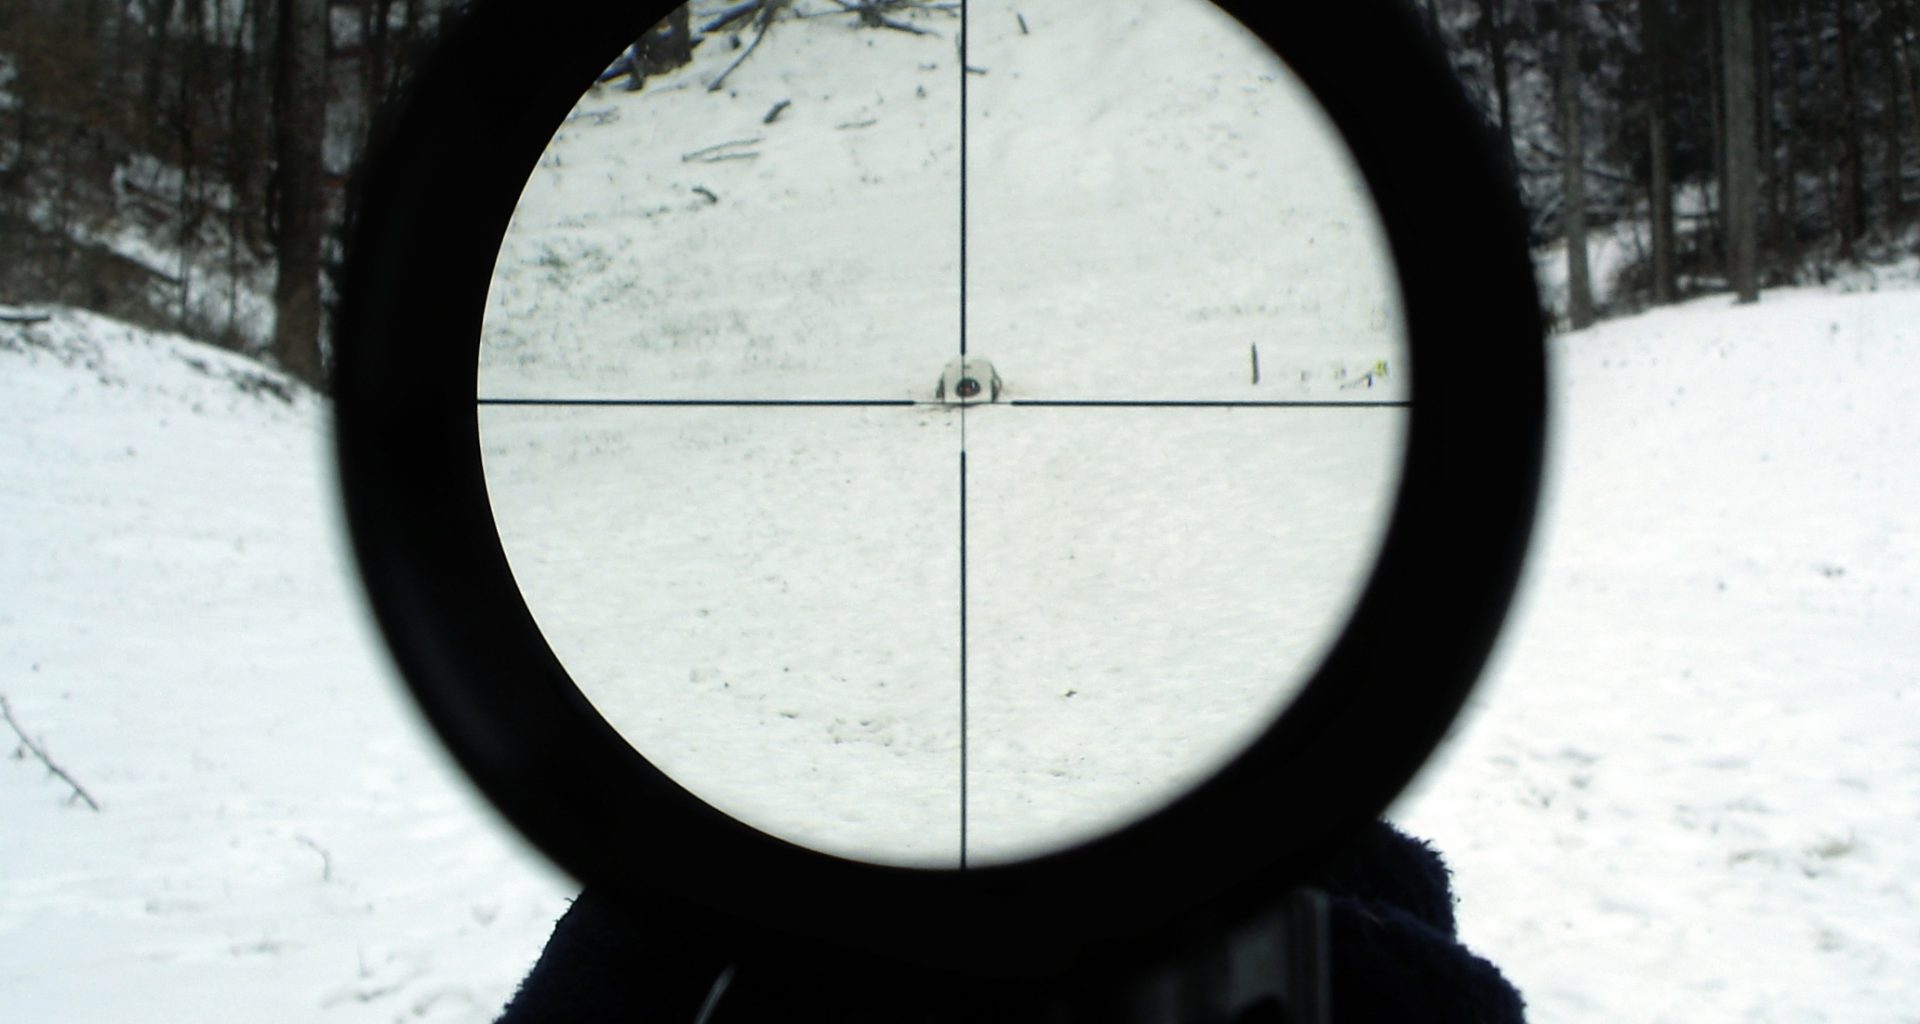
Scope Parallax explained
Parallax is an optical illusion that forms when the image of the target and reticle are not precisely in the same plane. When the shooter’s eye moves up and down, or side to side, the target or reticle seems to move in relation to the other.
Setting up your Scope
First stage
- Before you start setting up your scope, put your eyeglasses on if you wear them. Start by screwing the Eyepiece out (counterclockwise) until it stops.
- Lift the scope and look over it towards the sky while relaxing your eyes. Move the scope in front of the eye. The reticle should look blurry.
- Turn the Eyepiece in a half turn and then again. Do this until the reticle improves.
- As it gets better, turn the Eyepiece in a quarter turn until the reticle is fully sharp.
- Turn it back in one turn and then back in place to ensure you’ve got the same sharpness in the same place.
- Lock the ring on the Eyepiece and you need never touch it again. Ever.
Second Stage
- Secondly, set the scope down on a solid surface with a target at least 1000 yards or more away. If the scope has an Adjustable Objective (AO), set it for infinity.
- Look at the target and move your head side to side, or up and down. If the reticle appears to move, there is parallax.
- Change the distance setting and do the same with moving your head or eye and adjust the distance at the same time until your view gets better.
- Note the calibrations on the AO of a scope are only estimates.
Third Stage
- With front objective adjustments, you can turn them either way, but with side adjustment scopes, the adjustment must always be done from the infinity end of the dial.
- Turn the adjustment until it stops past infinity and turn it a little bit at a time until there is no parallax. If you go passed the proper settings, go back to the end of the dial and start again.
- After find the infinity setting on the side focus models, carefully loosen the screws and set the dial so the infinity symbol lines up with the hash mark to calibrate it.
Fourth Stage
- To set it to infinity, turn the dial all the way past infinity to the stop. Do this every time before changing from a close to long range. If its set for 500 yards, you can go to 100 yards but if doing this the other way around from close to long, you need to go all the way back to the stop before going to 500.
- The reason being that because there is a bit of backlash (aka SLOP) in the wheel linkage to the focusing cell, you can only set it from one direction to make sure the SLOP is only on one side. If you want to calibrate it from the other end, the recoil will push the cell back. Therefore, always set the dials from the infinity end.
![Best Illuminated Reticle Scopes [2018]](https://www.snipercountry.com/wp-content/uploads/2018/06/Best-Illuminated-Reticle-Scopes-2018-260x195.jpg)